Alembic Pot Still Alcohol Distilling Instructions
IMPORTANT POINTS TO NOTE BEFORE GETTING STARTED
- The Copper Dome and Alembic Condenser can also be attached to the Grainfather all grain brewing system. Where “boiler” is mentioned this could be the Grainfather or the T500 Boiler or other boiler that fits.
- It is best to use the dome and condenser for best quality results and maximum copper-vapour interaction. However you can use the condenser on its own with the boiler. This instruction manual assumes the use of both pieces together.
- Temperature probe – if you are used to using the T500 distillation system, you will be used to needing to control the temperature with your water flow. Please note when using this alembic pot still system the temperature reading on the condenser will fluctuate and should not to be controlled like the T500. That probe will mostly be showing you what the temperature is so you can make your cuts correctly
FOR USE WITH THE GRAINFATHER CONNECT ALL IN ONE BREWING SYSTEM
The Copper Dome and Alembic Condenser can be attached to the Grainfather to turn it from a brewing unit to a distilling unit. The Grainfather Connect Control Box (included with the Grainfather) has a ‘Power Control Mode’ where you can specify the power output rather than specifying the target temperature. To enter (or exit) power control mode, hold the heat button for 6 seconds (there is also be an option to enter this mode from the mobile device app). Once power control mode is active, the LCD screen will change to only display the current temperature and power output. You can use the up/down buttons to change the power output in 5% increments. The benefit of this for distilling is that you can lower the power output to slow down the speed at which the distilled spirits comes out. This is desirable during the spirit run when you are making cuts to separate the heads and tails from the hearts. You should make your cuts at specific output temperatures (or ABV) which changes constantly, but if you slow down how fast the spirit comes out you have more time to take the measurements and make your cuts at the right time.
WHAT ARE CUTS AND WHY DO WE NEED THEM?
The fermentation process of the yeast converting sugars into ethanol also results in many other compounds as by products. These other components are mostly made up of acetaldehyde, esters, ethyl acetate, acetal, and a small amount of methanol to name a few. All of these occur in the same quantities in the wash as are present in beer. However, these components, called congeners, increase in concentration when they are distilled and can lead to levels which have undesirable tastes or are even harmful. These congeners have different boiling points to that of ethanol so when the wash is distilled some congeners come out before the majority of the ethanol, and others come out after the ethanol. This causes the flavour profile coming out of the still to change markedly over the course of the distillation. Some of these congeners contribute desirable flavours to the distilled spirit; these are normally the congeners with the boiling point closest to ethanol. Other congeners taste and smell very similar to paint thinners or nail polish remover. At the beginning of a distillation any methanol present in the wash will be the first to be distilled off, followed by other lower boiling point congeners. These lower boiling point compounds contribute quite a chemical taste to the spirit, and are mostly responsible for causing ‘hangovers’. Over time these undesirable and harsh flavours will slowly be replaced by much smoother, sweeter tasting spirit. Then as the distillation is nearly over the smooth sweet spirit will slowly change into a bitter, undesirable flavour which is described by some people as ‘wet cardboard’. This changing flavour profile is what leads us to making what are called ‘cuts’ during the distillation. The harsh tasting chemical flavours at the beginning are what are referred to as the ‘heads’, the smooth, sweet spirit in the middle of the distillation is the ‘hearts’ and the final bitter, low alcohol spirit is referred to as the ‘tails’. The change between these sections gradually occurs and so the real art of distilling comes into what you let into your final spirit. This is completely influenced by when you make your cuts which can be a difficult decision to make at the time of distilling. Because of this difficulty it is recommended that users collect the heads and tails sections in multiple small containers. Then, the transition to the hearts section from the heads can be made later than it should be and the containers with the desirable flavours can be blended back into the hearts section after distillation is complete. The same should be done for the tails section, except in this case the hearts section should be finished early.
WHY DO MULTIPLE DISTILLATIONS?
For every distillation using a pot still the product becomes increasingly refined. The ethanol purity increases, and more and more flavours are stripped from the product. For some types of spirit such as vodka or gin, referred to as white spirit, this is desired, as a very pure and clean tasting product is desired. For these spirits generally the more distillations the better and distillers find a balance between quality and yield. Traditionally white spirits were made using pot stills and multiple distillations, but as still technology has developed these spirits are now made using reflux stills that can produce triple or even quadruple distilled quality spirit in one run. For other spirits, such as whiskeys, rums and brandies, the flavours present in the wash contribute significantly to the flavour of the final spirit. Because of this a balance needs to be achieved between making a smooth-drinking spirit, and also one which has a nice flavour. Pot stills are a great way of achieving this and two distillations provides the perfect balance between obtaining a smoothdrinking final product and also one which contains the fantastic flavours present in the wash. The first of these two distillations is referred to as the stripping run, and the second is called the spirit run. You can still produce a brown spirit using a single distillation, the resulting product will be of a lower percentage and less refined, but it will carry through more of the flavour of the wash. Brown spirits can also be triple distilled, this will lead to a very refined product where a majority of the end-flavour will come from the aging process, not from the flavour of the wash.
PREPARING A WASH TO DISTIL – BEFORE YOU BEGIN
Before distilling can take place it is paramount to ensure that fermentation has completely finished. This can be done by using a hydrometer to check that the specific gravity remains constant for 3 days, or if you have achieved the desired final gravity of your recipe. If fermentation is not completely finished, there will be unfermented sugars left in the wash and this can lead to excessive frothing of the wash inside the boiler. If this gets out of hand the wash can froth up through the condenser and undistilled wash can make its way into your distillate output. When fermentation is finished, it is important to clear the wash to be ready for distilling. Yeasts release off flavours when they are put under stress, and boiling the wash when there are still significant amounts of yeast present leads to off flavours in the final spirit. To counteract this it is a good idea to clear the wash, and then only transfer the cleared wash without the dead yeast into the boiler. This can be done by siphoning the top of the cleared wash off and not disturbing the yeast particles at the bottom of the fermenter. There are multiple methods to clearing a wash, the fastest and most effective method is to use Still Spirits Turbo Clear as per the instructions on the packet. A wash will naturally clear over time as well, but if you wish to accelerate this process the wash can be chilled to 4°C (39°F) for 24 hours. This will help the suspended yeast and proteins flocculate together and drop to the bottom of the fermenter. Once cleared, transfer the wash to the boiler in preparation for distilling. Add the Still Spirits Distilling Conditioner and the ceramic boil enhancers.
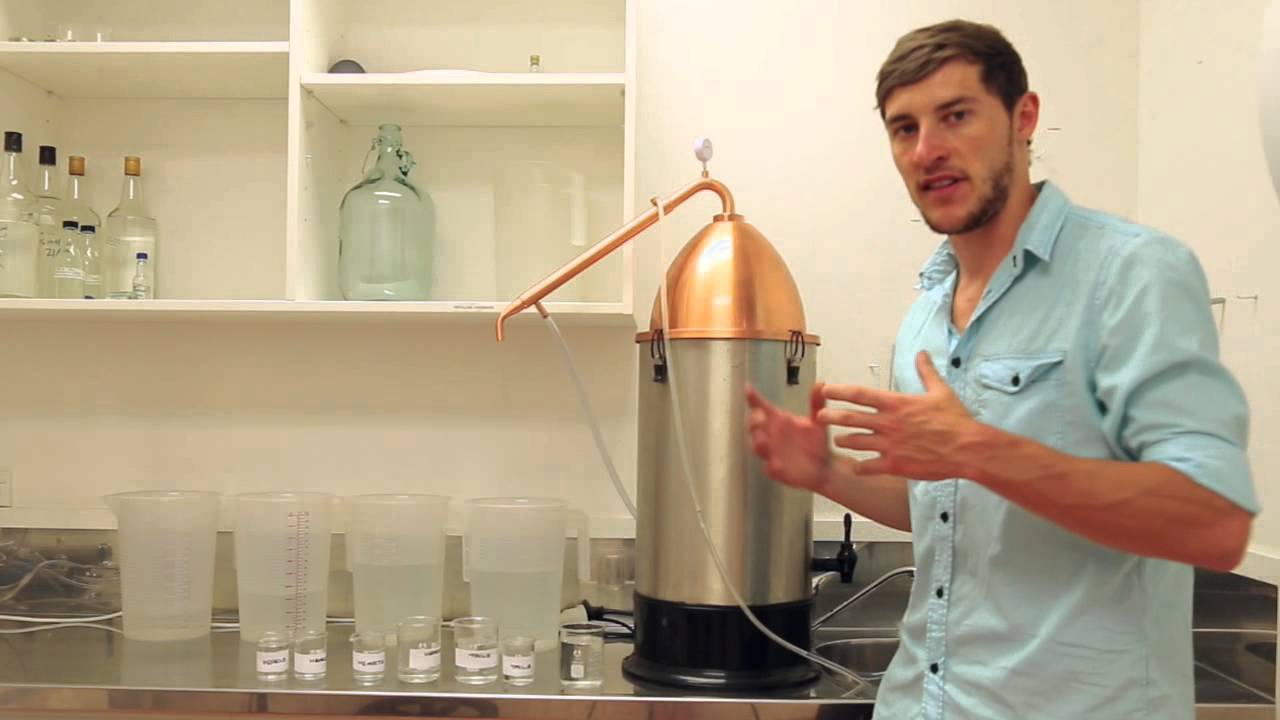
PREPARING THE ALEMBIC POT STILL
- Attach the copper condenser arm to the copper dome by removing the nut and O ring from the base of the condenser. Sit the condenser on the dome and screw the nut and O ring back into the condenser (check the lid isn’t spinning anymore) to firmly attach the dome to the condenser.
- Insert the thermometer probe into the hole at the top of the column.
- Attach the tubing for the water cooling of the condenser. The thin tube is for the outlet water and connects near the top of the condenser arm and takes the water back to the sink. The thicker tube connects to the water inlet near the tip of the condenser arm, with the other end connecting to the tap.
- Briefly turn on the cooling water supply to ensure there are no leaks in the system. Check again that the water goes in at the end where the spirit comes out and that the water comes out closest to the top of the lyne arm (at the end near the thermometer probe).
DISTILLING A WHISKEY, RUM OR BRANDY
Distilling what is called a brown spirit is typically done in two distillations. The first of which is referred to as the stripping run, and the final run is called the spirit run.
STRIPPING RUN
The stripping run is the easier and rougher of these two runs. Each distillation removes flavours and increases the ethanol percentage of the spirit. The result from a stripping run will have 5-6 times the ethanol concentration and a fifth to a sixth of the volume of the original wash. For the stripping run we will distil the wash, and collect all output in the same container until the output of the distilling drops below 20% ABV.
To perform a stripping run you will need:
- 5L (1.3 US Gal) glass carbuoy
- An Alcoholmeter that reads from 20% ABV to 100% ABV + thermometer
- Still Spirits Distilling Conditioner
- Ceramic Boil Enhancers
- Cooling water supply and sink
Once the pot still has been prepared, turn the boiler on and switch it to boil. The liquid inside will begin to heat up and eventually start to boil. When the temperature on the condenser temperature probe reads around 55°C (131°F) it is a good idea to turn on the cold water tap.
Adjust the flow through the condenser to around 2.5 L/minute. You can measure water flow by using a measuring vessel (1 L (1 US qt) jug or kitchen cup measurer) and timing how many ml or US fl oz flow into the measuring vessel per minute. It is very important to ensure the water flow through the condenser is large enough to ensure the output distillate is coming out as a liquid and not a vapour. Not only is this ethanol vapour extremely flammable, it will also result in a reduced yield from your run. For a stripping run collect all of the distillate output in one container until the distillate ABV is 20% ethanol or the vapour temperature is around 98°C (208°F). The temperature of the distillate has a large effect on the ethanol reading. Calculators exist online to correct for temperatures effects. Further output can be collected in a separate container and this can be added to a future stripping run to maximise the yield from future runs. Turn off the boiler, disconnect from the power outlet and wait for the contents inside to cool down to a safe temperature. Then discard the contents inside the boiler, this leftover liquid is an excellent fertiliser. Clean the boiler, pot still dome and condenser thoroughly with warm soapy water and rinse thoroughly.
SPIRIT RUN
The spirit run is the more important of these two runs, and real care needs to be paid to separate the different fractions present in the stripping run output. If you haven’t already, it is strongly advised to read What are Cuts and Why do we Need Them? before continuing.
You will need:
- 5 L (1.3 US Gal) glass carbuoy
- An alcoholmeter that reads from 20% ABV to 100% ABV, a 50 ml (1.7 US fl oz) sample collection tube + thermometer OR a Still Spirits Parrothead+ alcoholmeter + thermometer
- Cooling water supply and sink
- 6 x 150 ml (5 US fl oz) containers for collecting fractions
The output from multiple stripping runs can be combined into one spirit run to save time and be able to collect more graduations of heads/tails for blending. This makes the transitions between heads and hearts more clear and is ideal if you want to make a larger amount of the same spirit. Measure your stripping run ethanol content, and if necessary dilute the spirit. Dilute the spirit down to 40% ABV by adding water. Diluting the spirit down to 40% ABV is important for the spirit run to be effective and gives a fuller boil. Once diluted add the ceramic boil enhancers. It is not necessary to add distilling conditioner. Prepare the pot still system identical to how you set it up for the stripping run, and then turn on the boiler.
FORESHOTS
Once the temperature probe reaches 55°C (131°F) turn on the cold tap water. When the distillate begins to come out, you can collect the foreshots which is the more harmful components of the heads and is typically the first 200 ml (6.8 US fl oz). This section contains the most harmful compounds present in the wash and should be discarded. NOTE: the foreshots section is 200 ml (6.8 US fl oz) per stripping run distillate.
HEADS
After the foreshots is over you will be entering the heads section of distilling. This contains a lot of the lower boiling point components as well as ethanol. Collect these into separate small containers, and once distilling is complete decide whether they are suitable for the final whiskey or not when blending the heads and tails into the hearts section. Start collecting the heads in separate containers with a volume of around 150 ml (5 US fl oz), putting them to the side once full. Label each filled cup with a number in the order it comes out of the still, eg 1 for the first cup, 2 for the second cup and so on. Once the temperature reaches around 83-85°C (181 – 185°F) the heads section is complete and it is time to start collecting the hearts. - The volume of these containers varies depending on the volume of liquid for the spirit run and personal preference. A good guideline is around 150 ml (5 US fl oz)/stripping run. This gives a good balance between ease of distilling and ability to blend well later on.
HEARTS
Place a larger vessel under the output tube and start collecting all of the hearts in the one vessel. This middle part is good spirit so does not need to be separated into containers. Continue collecting the hearts until the spirit is coming out at around 55% ABV. Once the still temperature reaches 90°C (194°F) the heart section is complete and it is time to collect the tails. The hearts collected in the middle of the spirit run are the best part of the spirit and will form the base for which to blend with after distilling is complete.
TAILS
Start collecting the tails in separate containers, putting them to the side once full, just as was done when collecting the heads of the spirit. Label each filled cup with a number in the order it comes out of the still (like for the heads). Once the still temperature is around 93-95°C (199 – 203°F) the tails collection is complete. At this temperature, the good part of the tails has all been collected. It is now time to start collecting the ends of the tails. Place a larger vessel under the still and collect the last of the tails in a larger vessel until temperature is around 98°C (208°F) or the output is below 20% ABV, then turn off the boiler and disconnect it from the power outlet. This last part of the tails is not used in final spirit but can be kept to increase the yield for future stripping runs. Wait for the boiler contents to cool to a safe temperature before discarding the contents. Clean the boiler, dome top and condenser thoroughly and rinse well.
BLENDING
What you have collected is the heads, the hearts, the tails, and the final of the tails. The heads and tails are both in multiple separate containers whilst the hearts are in one large container. The reason you have collected the heads and tails in small sample fractions is that not all of the heads and tails will be good to use and mix in with the hearts. Normally the last few cups of the heads (closest to the hearts), and the first few cups of the tails (closest to the hearts) will be good to add in with the hearts but you will need to taste each sample container and choose what you want to add into your mix. By collecting these heads and tails in separate fractions, less emphasis has been placed on when to make the heads and tails cuts during the distilling. Work your way through tasting and smelling each of the heads and tails fractions and add each container you are happy with to your hearts container. You do not necessarily have to add the entire container. The heads of the spirit generally adds the harsher flavours to the spirit but contains a large percentage of ethanol, whereas the tails contains a lot of the flavours but a small percentage of ethanol. Add any fraction samples from the heads and tails that you are not happy with to the second large container with the final part of the tails. This large tails container, called the ‘feints’, is not necessarily bad but it has not been refined enough yet to use in the final spirit. This should be saved and can be added to the next stripping run you do with your next batch of whiskey so that it is not all wasted. Alternatively, these feints can be collected from multiple whiskey batches and when you have enough, doing a spirit run of all feints can lead to a delicious whiskey.
AGEING
Dilute your final collected spirits you are happy with down to 50% ABV with filtered or distilled water in a large 5 L (1.3 US Gal) glass jar or demijohn, use an alcoholmeter, hydrometer or refractometer to measure the ABV. There are water calculators online to aid in dilution. Make sure your jar is large enough and still has more space as you will be required to add more water to this jar as the ageing process progresses. Add some Charred American Oak Infusion spirals to your whiskey as per the instructions on the spirals and leave it in a cold, dark area for the ageing process. The flavour will begin to extract from the spirals instantly, and after 2 weeks this flavour will be completely extracted. Taste the whiskey periodically during the ageing process, the spirals can be removed at any time as to your preferred taste. Leave the spirits to age for 3 weeks in a cool dark place. After 3 weeks dilute spirit with filtered or distilled water to 47% ABV. After 6 weeks, dilute again with filtered or distilled water to 44% ABV, and after 9 weeks dilute it further to 40% ABV. - Adding the water slowly during the ageing period gives the whiskey a better, more rounded flavour than adding it all at once. Taste the whiskey periodically during the ageing process and it should be ready after a minimum of 2 months. The more heads and tails that were included in the blending process typically means the whiskey will need to age longer. Drink and enjoy.
DISTILLING NEUTRAL SPIRIT FROM A SUGAR WASH
Distilling from a sugar wash is typically performed to obtain the highest purity and cleanest tasting product possible. The raw flavours of a sugar wash are rarely sought after in the final product, this just provides the fastest and cheapest method of producing ethanol. Because of this, reflux stills are the normal method of producing these spirits. Using a pot still is definitely still possible it just results in a reduced yield to that of which is possible in a reflux still. Obtaining a product that can be used for making liqueurs or other flavoursome spirits can be achieved using one distillation, although doing a second distillation greatly improves the quality and is worth the sacrifice in yield. If a very clean tasting vodka is required then a third distillation can be performed. Before distilling, follow the steps for Preparing a Wash to Distil and Preparing the Alembic Pot Still on pages 4 and 5. If all you wish to do is a single distillation, then skip this stripping run step.
STRIPPING RUN
The first distillation is referred to as a stripping run, and is the least involved of the two (or three) distillations. In this step we will collect all of the output from the still in one container until the output ethanol is 20% ABV.
You will need:
- A 5L (1.3 US Gal) glass carboy
- An alcoholmeter that reads from 20% ABV to 100% ABV + thermometer OR a Still Spirits Parrothead + alcoholmeter + thermometer
- Still Spirits Distilling Conditioner
- Ceramic Boil Enhancers
- Cooling water supply and sink.
Once the pot still has been prepared, as per the instructions on page 5, turn the boiler on so it can boil. The liquid inside will begin to heat up and eventually start to boil. When the temperature on the condenser temperature probe reads around 55°C (131°F) it is a good idea to turn on the cold water tap. Adjust the flow through the condenser to around 2.5 L/minute. You can measure water flow by using a measuring vessel (1 L (1 US qt) jug or kitchen cup measurer) and timing how many ml or US fl oz flow into the measuring vessel per minute. It is very important to ensure the water flow through the condenser is large enough to ensure the output distillate is coming out as a liquid and not a vapour. Not only is ethanol vapour extremely flammable, it will also result in a reduced yield from your run. For a stripping run collect all of the distillate output in one container until the distillate ABV is 20% ethanol or the vapour temperature is around 98°C (208°F). The temperature of the distillate has a large effect on the ethanol reading (from alcoholmeter). Calculators exist online to correct for temperature effects. Further output can be collected in a separate container and this can be added to a future stripping run to maximise the yield from future runs. Turn off the boiler, disconnect the boiler from the power outlet and wait for the contents inside to cool down to a safe temperature. Then discard the contents inside the boiler, this leftover liquid is an excellent fertiliser. Clean the boiler, dome and condenser thoroughly with warm soapy water and rinse well. If you plan on doing a third distillation, then dilute the stripping run output to 40% ABV and repeat the stripping run.
SPIRIT RUN
The spirit run is the more important of these two runs, and real care needs to be paid to separate the different fractions present in the stripping run output. If you haven’t already, it is strongly advised to read What are Cuts and Why Make Them? On page 3 before continuing.
You will need:
- A 5L (1.3 US Gal) Glass Carbuoy
- An alcoholmeter that reads from 20% ABV to 100% ABV, a 50 ml (1.7 US fl oz) sample collection tube + thermometer OR a Still Spirits Parrothead + alcoholmeter + thermometer
- Cooling water supply and sink
The output from multiple stripping runs can be combined into one spirit run to save time if you are planning on producing a lot of spirit. This makes the transitions between heads and hearts more clear and is ideal if you want to make a larger amount of the same spirit. Measure your stripping run ethanol content, and if necessary dilute the spirit. Dilute the spirit down to 40% ABV by adding water. Diluting the spirit down to 40% ABV is important for the spirit run to be effective and gives a fuller boil. Once diluted add the ceramic boil enhancers. It is not necessary to add distilling conditioner. Prepare the pot still system identical to how you set it up for the stripping run, and then turn on the boiler.
FORESHOTS
Once the temperature probe reaches 55°C (131°F) turn on the cold tap water. When the distillation begins to come out, you can collect the foreshots which is the more harmful components of the heads and is typically the first 200 ml (6.8 US fl oz). This section contains the most harmful compounds present in the wash and should be discarded. NOTE: the foreshots section is 200 ml (6.8 US fl oz) per stripping run distillate.
HEARTS
The next section of distillate is the hearts of the spirit. Place a larger vessel under the output tube and start collecting all of the hearts in the one vessel. Continue collecting the hearts until the spirit comes out at 40% ABV and the temperature probe reads 92°C (198°F).
TAILS
Anything after this can be regarded as tails, and can be discarded or collected with a 1-2 L (1-2 US qt) container and added to a future stripping run to increase the yield. The tails can be collected down to 20% ABV. Turn off the boiler and disconnect it from the power outlet. Wait for the boiler contents to cool to a safe temperature before discarding the contents. Clean the boiler, dome top and condenser thoroughly and rinse well.
DISTILLING USING A BOTANICALS BASKET
The popular alcoholic drink gin is pure alcohol flavoured with juniper berries and other botanicals. This can be made by steeping the juniper berries in pure spirit in a process known as bath-tub gin, or it can be made by vapour infusing the juniper and botanicals flavours into the spirit as it is distilled. This is the method used by most high quality gin distilleries. The Still Spirits Botanicals Basket, allows you to vapour infuse any flavours you wish into your spirit’s vapour as it is being distilled. The different flavours present in the botanicals basket come out at different stages of the distillation. Because of this the final step with the botanicals basket should not include any cuts. To make a gin, follow the instructions for distilling a vodka above first. Then continue with the following:
You will need:
- 5L (1.3 US Gal) glass carbuoy
- An alcoholmeter that reads from 20% ABV to 100% ABV, a 50 ml (1.7 US fl oz) sample collection tube + thermometer OR a Still Spirits Parrothead + alcoholmeter + thermometer
- Cooling water supply and sink
- Still Spirits Botanicals Basket or other basket that fits
Measure your stripping run ethanol content, and if necessary dilute the spirit. Dilute the spirit down to 40% ABV by adding water. Diluting the spirit down to 40% ABV is important for the spirit run to be effective and gives a fuller boil. Once diluted add the ceramic boil enhancers. It is not necessary to add distilling conditioner.
PREPARATION
- Attach the copper condenser arm to the copper dome. Instead of using the nut and o-ring, secure the condenser arm to the dome top using the head of the Still Spirits Botanicals Basket. Screw this tight, and ensure the dome top cannot rotate relative to the condenser.
- Insert the thermometer probe into the hole at the top of the column.
- Attach the tubing for the water cooling of the condenser. The thin tube is for the outlet water and connects near the top of the condenser arm and takes the water back to the sink. The thicker tube connects to the water inlet near the tip of the condenser arm, with the other end connecting to the tap.
- Briefly turn on the cooling water supply to ensure there are no leaks in the system. Check again that the water goes in at the end where the spirit comes out and that the water comes out closest to the top of the lyne arm (the end near the thermometer probe).
- Fill the base of the botanicals basket with your chosen botanicals, and screw this into the head of the botanicals basket.
- Secure the dome top onto the boiler using the clips present.
SPIRIT RUN
Turn on the boiler and wait for the contents to heat up. Once the temperature probe reaches 55°C (131°F) turn on the cold tap water. Since all of the harmful components have been removed in the last spirit run with this spirit it is not necessary to make any heads or tails cuts. Place a large vessel under the output tube and start collecting all of the output in one vessel. Continue collecting until the spirit is coming out at 20% ABV. Anything after this can be regarded as tails, and can be discarded or collected with a 1-2 L (1-2 US qt) container and added to a future stripping run to increase the yield. The tails can be collected down to 10% ABV. Turn off the cooling water supply. Turn off the boiler and disconnect it from the power source. Wait for the boiler contents to cool to a safe temperature before discarding the contents. Clean the boiler, dome top and condenser thoroughly and rinse well.
TROUBLE SHOOTING GUIDE
| WHAT IS THE PROBLEM? |
WHY IS IT HAPPENING?
|
HOW TO FIX IT? |
| Alcohol distillate flows irregularly |
|
|
| Spirit is coming out cloudy/ milky/dark |
|
|
| The yield is low |
|
|
| The boiler has stopped heating even though power is on |
|
|
| Small solids are in the distillate outlet |
|
|
| Spirit is coming out very hot/steam |
|
|
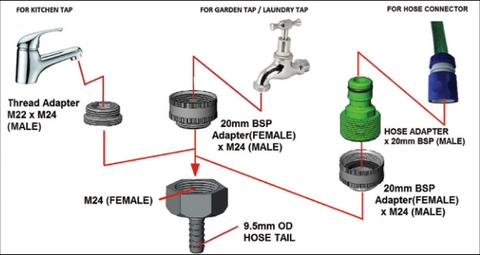
TAP ADAPTORS
FREQUENTLY ASKED QUESTIONS
What is the distilling conditioner?
Distilling conditioner is an anti foaming product, made of silicones and is suitable for human consumption. This reduces the chance of foaming in the boiler and promotes optimum distillation conditions. The wash can froth when boiling (this may be due to the presence of residual sugar not entirely fermented, or a wash not cleared). Froth can enter the condenser and then make its way through the output as undistilled liquid. To help prevent foaming we recommend adding 3 capfuls of Still Spirits Distilling Conditioner.
Why is it important to ensure the distillate comes out as a cool liquid?
Ethanol is a very flammable substance, and if the cooling liquid is not running it will come out as a vapour which can be extremely dangerous. Also, temperature changes the alcohol readings of the spirit a great deal. As most alcoholmeters are designed for 20°C (68°F) spirit there will be large inaccuracy in the ethanol percentage which could affect when you are making your cuts.
Can the alembic pot still be used as a reflux still?
The process of redistilling the output through the pot still will improve the spirit quality much like refluxing does, but it will have a reduced yield to that of a reflux still. In order to reflux you would need a reflux column.
How long can I keep a wash before distilling it?
We recommend distilling a wash within one week of clearing. The longer it is left, the more off flavours may develop cause by autolysis of the dead yeast cells. It is likely to be fine for up to eight weeks if kept sealed and cool. What’s in the clearing agent and how does it work? Still Spirits Turbo Clear is made up of silicic acid (Part A) which charges floating particles and chitosan (Part B) attracts all particles (with its opposite charges) to eventually make them settle on the bottom of the fermenter.
How hot does the boiler get?
The liquid inside the boiler will get as hot as its boiling point, ie 100°C (212°F) for water, 78.2°C (173°F) for ethanol. As the wash contains a mix of water and alcohol the temperature the wash boils at rises as the alcohol is driven off. You will need to boil the wash to convert the alcohol to steam so you can extract the alcohol from the wash.
Can I distil two batches in a row?
The wash left inside the boiler after the first distillation is boiling hot. If you wish to run the still again then very carefully remove the very hot lid and add at least 5L (1.3 US Gal) of cold water to the spent wash to cool it quickly before emptying. Be very careful of the ethanol vapour present in the boiler as well.
The inside of my copper dome has lost its shine, why? And what should I do?
After a few distillations, the inside surface of the dome and condenser will lose the polished copper look and take on a more dull patchy brown. This is natural and expected and no amount of physical scrubbing will remove this change in colour. During distilling unwanted sulphur flavours reacts with the copper on the dome and sticks to the copper surface without continuing into the output vessel. This is why copper is superior to other metals for distilling. The still can be washed with vinegar or another light acid to bring back the polished look, but this is only for cosmetic reasons.
How can I recycle my cooling water?
You can run your cooling water in a closed circuit, provided you have a sufficient amount of water and ice packs and a pump that provides enough flow. We suggest using a 200 L (53 US Gal) container (eg a rubbish bin), filled with water, and add 6 x 2 L (2 US qt) bottles filled with water and frozen a few days ahead. Your cooling water can also be kept in big containers and later reused for your garden.
How much does it cost to run the still?
The still uses 2kW/hour (NZ/AU/UK) and 1.5kW/hour (US). You can multiply this by the power rate paid, by the time the still is operating (5 hours). Add to this the cost of the cooling water, based on the flow rate used and the cost of raw materials required to produce the wash. Is there methanol produced? There is methanol present in the final product, but at no greater concentrations than any commercially produced spirit. Methanol will be the first liquid distilled off, so as long as the instructions of discarding the foreshots is followed correctly there is no way for methanol poisoning.
Why do I need ceramic boil enhancers?
The reusable ceramic boil enhancers should be added in the boiler before distilling to avoid surge boiling. Stainless steel saddles do the same.
Why does the pot still equipment need to be copper?
Without a large amount of copper present in the system, sulphur components found in the yeast cells will make their way into the final spirit, creating off colours and very undesirable flavours. Copper acts as a catalyst for these sulphur components to react into hydrogen sulphate and when this happens these flavours and off colours do not ruin the final spirit.
How long is fermentation usually?
A wash usually takes between 4 and 10 days to ferment depending on the yeast used and the temperature.
How do I know when fermentation is finished?
A few ways:
- Measure your SG with a hydrometer, when the SG matches the desired SG for your given recipe and has read that for two consecutive days then fermentation is complete.
- Look for fizziness, bubbles rising to the surface: while it’s fermenting there are lots of bubbles coming to the surface.
- Check the activity in the airlock.
SAFETY
Warning: This system produces a highly flammable liquid.
PRECAUTION:
- Always use the Alembic Pot Still System in a room with adequate ventilation.
- Never leave the Alembic Pot Still system unattended when operating.
- Keep the Alembic Pot Still system away from all sources of ignition, including smoking, sparks, heat, and open flames.
- Ensure all other equipment near to the Alembic Pot Still system or the alcohol is earthed.
- A fire extinguishing media suitable for alcohol should be kept nearby. This can be water fog, fine water spray, foam, dry powder, carbon dioxide, sand or dolomite.
- Do not boil dry. In the event the still is boiled dry, reset the cutout button under the base of the still. In the very unlikely event this cutout fails, a fusible link gives an added protection.
IN CASE OF SPILLAGE:
- Shut off all possible sources of ignition.
- Clean up spills immediately using cloth, paper towels or other absorbent materials such as soil, sand or other inert material.
- Collect, seal and dispose accordingly
- Mop area with excess water.